This article is the operator's manual for the Polaris 4 Gen1 motorhome - New Zealand Self Contained (JUCY / Star RV). It covers keys, fire extinguisher, smoke alarm and gas alarm, starting the vehicle, windows and vents, entry door, outdoor step, seatbelts, the 240-volt and 12-volt electrical systems, microwave, fresh water, grey water, water pump, hot water heater, toilet use and cassette, gas bottle, stove top and grill, heater, fridge, lights, television, bed conversion, awning, diesel fuel, jack and spare tyre, barbecue, additional information, and dashboard warning lights.
Need-to-know
- Fuel type: Diesel only. The fuel cap is marked "DIESEL" and is unlocked using the vehicle diesel key. If filled with unleaded, water, or AdBlue - do not start the engine. Call STAR RV Roadside Assistance immediately.
- AdBlue: Required (if applicable). AdBlue cap is next to the fuel filler cap and is blue. Fill with at least 5 litres. Do NOT add AdBlue to the fuel tank.
- 240-volt: Required for microwave and power points. Two circuit breakers located outside the motorhome. Plug in every second night. You will know 240-volt is working when the microwave turns on and displays a clock.
- 12-volt panel: Located on the side wall just above the domestic switches. Needle should stay in the green section.
- Water pump: Push the PUMP switch down on the switchboard. Must be on for tap, shower, and toilet flush. Turn off when not in use. Do not run empty. Do not drink tap water unless boiled first.
- Hot water: Gas bottle on driver's side panel. Red light dims when ignited. Takes 30–40 minutes. 240-volt hot water activates automatically when plugged in.
- Heater: Gas-powered, runs off domestic battery. Dial operation.
- Fridge: 2-way (12-volt and 240-volt). Automatically switches to 240-volt when plugged in. Optimal setting between 4–5.
- Gas bottle: Located in LP gas locker. Can be refilled at LPG stations or swapped. Never drive with gas bottle open.
- Toilet cassette: Must be emptied and cleaned before returning to the depot.
- Smoke alarm: Powered by a replaceable 9V battery. Do not disconnect.
- Gas alarm: Located behind the rear cabin seats. If it beeps and shows a red light, open all windows and move to fresh air.
- Tyre size: 205/75 R/16C, 60 PSI.
- Oil / coolant: 5W30 engine oil. Red coolant (any brand).
- Emergency contact: STAR RV Roadside Assistance - call for wrong fuel, overheating, or any red dash light.
- Red dash light rule: Red = stop safely and call Roadside Assistance. Amber = drive cautiously and report.
1. Description of keys
Ignition key: Turn the key in the ignition barrel and release once the engine starts.
Side entry door key: Lock/unlock the vehicle's side entry door.
Toilet cassette compartment key: Lock/unlock the toilet cassette compartment (key has THETFORD engraving).
External storage compartments key: Use this key to lock or unlock the vehicle’s external storage compartments.
Please note: This key is applicable to LP Gas compartment on rear driver’s side, storage compartment on rear passenger’s side and small storage compartment beside driver’s cabin door.
Water tank / gas locker / outdoor shower key: Lock/unlock the vehicle's freshwater filling point.
2. Vehicle equipment
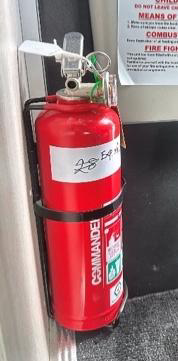
Fire extinguisher
Each vehicle is equipped with a dry chemical fire extinguisher, selected to address both Type B fires (grease and liquids) and Type C fires (electrical). A fire extinguisher is attached to the interior of the vehicle, behind the back seats.
To deploy the extinguisher:
- Grasp the ring at the top of the bottle.
- Direct the nozzle towards the base of the flames.
- Press the lever down firmly.
- Guide the nozzle from side to side across the base of the flames.
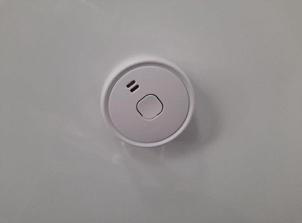
Smoke alarm
Each vehicle is furnished with a smoke alarm powered by a replaceable 9-volt battery. If a replacement is needed during your rental, purchase a new battery, retain the receipt, and reimbursement will be arranged upon vehicle return.
Do not disconnect the smoke alarm. It must be connected at all times for your safety.
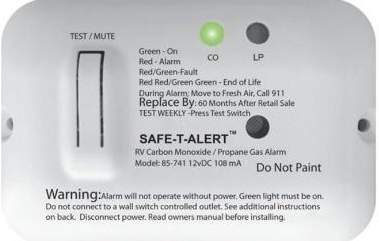
Gas alarm
Each vehicle has a harmful gas alarm located behind the rear cabin seats. If harmful gas levels are detected, the alarm will beep and a red light will illuminate. When this happens, open all windows and move to fresh air immediately.
3. Starting the vehicle
The gear stick must be in PARK and your foot on the brake pedal in order for the vehicle to start. Start the vehicle using the ignition key.
Gear stick in parking mode
With your foot still on the brake pedal, pull the gear stick down into the 'D' position. The dashboard will display a 'D' indicating drive.
Gear stick in driving mode
Handbrake: Located on the left, beside the driver's seat.
- To disengage: Pull up slightly with the button held. The handbrake will start to move down.
- To engage: Pull the button towards you. A white light will appear.
Note: Do not forget to disengage the handbrake before you drive.
4. Windows and vents
Windows: Turn the handles inwards. Push the window out and click the latch in place. The window has a mosquito net and a sun blackout blind. To use the sun blackout blind, pull the blind up using the handle indents.
Vents: Stand facing the driver's cabin. Grip the middle handle and twist so the hooks move out of the lock. Push towards the driver's cabin until it stops. To close, twist and pull until it closes completely.
5. Entry door
To open the door from outside: Pull the door handle outward.
To open the door from inside: Pull the door handle downwards and apply slight pressure to the door. When the door is locked, neither the inside nor outside door handle can be operated.
To lock from outside: Turn the key anticlockwise towards the lock symbol on the entry door lock.
To unlock from outside: Turn the key clockwise towards the unlock symbol on the entry door lock.
6. Outdoor step
The motorhome is equipped with a manual side doorstep. Grip the middle of the step and pull out until it locks into place. To close, push it towards the cabin until it clicks back into place.
Note: Do not leave the step out while driving as this may cause damage to the cabin exterior, step, or surrounding objects.
7. Seatbelts
It is the law in New Zealand that all passengers in a motorhome must be properly restrained with seatbelts. Vehicles are equipped with both lap and shoulder belts. Only seats fitted with seatbelts can be occupied while the vehicle is moving. Insert the belt tongue into the correct buckle until you feel it click and latch.
The two anchor points for baby seats are located behind the large back squab. There is no ISOFIX available.
Note: The table must always be removed while passengers are sitting at the dinette seats while in transit.
8. 240-volt electrical system
To run the microwave, power points, and to recharge the house battery, connect the motorhome's 15AMP electricity cord to a 240-volt external power source. These devices will only work when connected to 240-volt power. It is recommended that every second night the vehicle is charged at a powered outlet. You will know the 240-volt is working when the microwave turns on and displays a clock.
The motorhome connects to powered outlets at caravan parks.
Circuit breakers: The 240-volt outlets and appliances are protected by two circuit breakers located outside the motorhome. If a power surge trips the circuit breakers, locate them and switch back to the ON/UP position. Overloading the system can cause circuit breakers to trip.
Troubleshooting: If the 240-volt is not working:
- Check the 240-volt cord is connected properly to both the power site and the motorhome.
- Make sure the circuit breakers on both the power site and the motorhome have not tripped.
- If still not working, try a different 240-volt cord (usually available to hire at the campsite) or try an alternative power site.
- If none of the above work, call the Star RV helpline.
9. 12-volt electrical system
The motorhome has two batteries - one in the engine compartment and one under the passenger's seat (the auxiliary battery).
The auxiliary battery operates the TV, water pump, fridge, interior lights, extractor fan, and toilet. It is charged by both the alternator when the vehicle is being driven and by the 240-volt system when plugged into mains power.
The 12-volt electrical panel is located on the side wall, just above the domestic switches. The needle should stay in the green section. The more appliances you use, the faster the battery will drain.
10. Microwave
The microwave operates via 240-volt power only. The vehicle must be plugged into a powered site at a caravan park or campground.
Do not put the following in the microwave:
- Paper bags (except purpose-designed microwave bags such as popcorn bags)
- Aluminium foil
- Dishes with metal rims
- Plastic containers
- Wire ties from bread and metal utensils
- Styrofoam plates and cups
- Glass jars
Safe to use in the microwave:
- Microwave-approved glass, ceramic plates, and bowls
- Microwave browning dishes
- Microwave plastic wrap, wax paper, paper towel, and napkins
- Paper plates and cups
Troubleshooting:
- Microwave has no display: 240-volt power is not plugged in. Check the vehicle is connected to mains power and the powered outlet is working.
- Microwave has power but is not heating food: Microwave may be broken. Call the Star RV on-roads team for assistance.
- Sparks when the microwave is turned on: A metal object is in the microwave.
11. Fresh water tank
The vehicle has an onboard freshwater system consisting of a water pump and freshwater tank. The water tank has a 120L capacity and is located on the passenger side of the vehicle. This water is for the sink, shower, and toilet flush.
The motorhome comes with a freshwater hose to fill up the tank. When the tank is full, the water will overflow out of the water inlet.
Please note: You can check the water level on the domestic switchboard by pressing the test button. The green light will indicate how full the water is.
12. Grey water tank
The grey water holding tank collects wastewater from the kitchen, bathroom sink, and shower. You can see the level on the domestic panel switchboard - this is labelled "waste". Note: the grey water level indicator may give an inaccurate reading and show 100% even when empty. Empty the grey water tank as regularly as possible.
To empty the grey water tank:
- Collect the grey water hose from the storage compartment.
- Connect the hose to the outlet. Make sure it is firmly attached by pulling down the silver levers on each side of the attachment.
- Place the other end of the hose into a dump station disposal opening.
- Open the tank by turning the red lever towards you so it is parallel with the pipe. Wait for it to empty.
- Once the grey water is empty, close the lever, remove the hose, and stow it away in the storage compartment.
13. Water pump
To use water on board the vehicle, ensure there is water in the freshwater tank. On the switchboard, push the PUMP switch down. You will hear the pump quietly start. The pump operates as part of the 12-volt system. When you are not using the water pump, ensure it is turned off.
The water pump must be on to operate the kitchen tap, shower, and toilet flush.
Please note: Avoid running the pump when the water tank is empty. Operating the pump continuously with no water can cause damage.
Caution: Do not drink the water from the tap unless it has been boiled first.
14. Hot water heater
To operate the hot water heater:
- Turn the gas bottle valve on - located in the side panel on the driver's side. Twist anticlockwise to open and clockwise to close.
- Turn on the "water heater" switch. The red light next to the switch will illuminate and the boiler will ignite.
- Once the boiler has ignited successfully, the red light will dim. The water will take approximately 30–40 minutes to heat.
Please note: The motorhome is also fitted with a 240-volt hot water system. When connected to mains power, this will automatically activate and start heating the water. If water has already been heated via 240-volt, the gas hot water operation will be inactive.
15. Toilet use
- Turn on the water pump on the control panel.
- Push the blue button on the toilet to fill the base with water.
- Once finished, adjust the lever on the bottom of the toilet to empty into the cassette.
- Ensure the lever is in the closed position after use.
16. Toilet cassette
It is highly recommended to regularly empty the toilet cassette. It is mandatory to empty and clean it before returning the vehicle to the depot.
To empty the toilet cassette:
- Make sure the grey flush lever on the toilet is in the closed position. Lift the blue lever and remove the entire cassette from the vehicle.
- Head to the dump station and unscrew the blue lid on the toilet cassette.
- Rinse the cassette thoroughly and repeat the emptying process. Add a toilet chemical along with half to one litre of water.
- Insert the cassette back into the locker.
Note: It is crucial for the cassette to click back into position to align with the toilet above.
17. Gas bottle
The gas bottle is located on the exterior of the vehicle in a locker marked with an LP Gas Storage label.
Important: Never drive with the gas bottle turned to the open position.
- To open: Rotate the valve fully anticlockwise.
- To close: Turn the valve clockwise until securely tightened.
Gas bottles can either be refilled at gas stations that sell LPG or swapped for a full bottle.
If you smell gas:
- Extinguish all open flames and smoking materials.
- Do not touch any electrical switches.
- Shut off the gas supply at the gas bottle valve.
- Open doors, windows, hatches, and all other ventilation openings.
- Evacuate the area until the gas odour dissipates.
- Contact STAR RV for assistance.
18. Stove top and grill
Warning: Do not use cooking appliances for comfort heating. Always have sufficient ventilation when using the stove.
The motorhome is equipped with 1 electric ring, 2 gas hobs, and a gas oven which uses LPG.
To use the gas stove top:
- Make sure the domestic switch labelled "STOVE IGN" is on.
- Locate the gas bottle on the outside of the van and turn the valve on top fully to the open position.
- The glass lid must be fully upright. If the lid is partially open, the burners will not work.
- Push in, hold down, and turn the burner knob to your desired heat level.
- While the burner knob is still pushed in, press the igniter switch until the gas lights. Keep holding the burner knob in.
- Wait approximately 15 seconds before slowly releasing the burner knob.
Note: If the flame extinguishes, the burner knob may have been released too soon. Start from step 3 and try again.
To use the electric hob: Make sure you are plugged into a powered campsite and that the hob switch next to the stove is on.
If using a match: Light the match first, hold it next to the burner, then open the burner valve. If the stove does not ignite there may be insufficient power in the battery. Connect to mains power or use a match. The stove top lid must be in a fully upright position for the hotplate to ignite.
Danger: Misuse of the gas stove can result in fire and explosion in a motorhome/campervan just as it can in a kitchen. Use extreme caution when lighting the stovetop burners with a match. To prevent too much unburned gas from accumulating, first light the match, hold it next to the burner then open the burner valve.
19. Heater
To operate the heater, make sure the domestic battery has sufficient charge (needle in the green area of the voltage meter). Rotate the dial clockwise to the desired setting. You might hear a small "whoosh" as the gas ignites. The fan will start blowing air in about 30 seconds; heat should start flowing after 90–120 seconds. Adjust the digital setting to suit your comfort - the heater will cycle on and off to maintain the set temperature.
Sequence of operations:
- Switch on.
- Heater motor starts - 20 second pre-purge to clear gases from heat exchanger.
- Gas valve opens; spark generator operates.
- Motor speeds up to normal operating speed.
- Heater switches off when thermostat temperature is reached.
- Post purge - fan runs on its own for 3 minutes.
- Temperature drops.
- Cycle repeated.
Troubleshooting:
| Problem | Possible cause | What to do |
|---|---|---|
| No ignition. | Low battery or gas not on. | Check gas supply and battery. |
| Heater clicks but no heat. | Air in gas line or blocked vent. | Purge line and check vents. |
| Blowing cold air only. | Set temperature too low. | Increase the temperature on the dial. |
| Unit won't power on. | Blown fuse or power off. | Check fuses and 12-volt system. |
20. Fridge
The fridge is operated on the domestic battery and 240-volt hook-up. Make sure the domestic switch is on. Once you plug into a powered campsite the fridge will automatically switch to 240-volt.
To adjust the temperature, rotate the dial to the desired number - the higher the number, the colder the fridge. Note: the higher the setting, the more power it will use. The optimal operating range is between 4 and 5.
Fault finding:
| Fault | Possible cause | Action |
|---|---|---|
| Fridge not cold. | No power supply; low battery; faulty fridge. | Check that the switch is on and the domestic battery has over 10v power. |
| Compressor makes only short start attempts. | Bad power supply; too low voltage or voltage drop at start attempts; discharged batteries. | Charge batteries, run the engine, connect battery charger, or plug into powered campsite. |
Please note: If the above action fails, call the Star RV helpline.
21. Lights
To use the cabin lights, turn on the light switch in the domestic control panel by holding the power button.
Some lights can be individually switched off using switches located on the lights themselves. You can also control a section of lights using the light switches located by the cabin door and the bathroom door.
22. Television
Each vehicle is fitted with a DVD/television. The TV operates on both 12-volt and 240-volt mains power. Television reception may vary in rural areas and works better when plugged into a powered campsite. Bringing your own DVDs is recommended for use with the built-in DVD player.
23. Bed conversion
The motorhome has three double beds.
Bed 1 - Middle dinette:
- Remove the tabletop from the wall by pushing the clips down. Fold the leg and store it behind the front passenger seat.
- Put aside the middle squab.
- Pull out the frames.
- Place the tabletop between the seats, then put the middle squabs over the table. Position the long squab over the frames.
Bed 2 - Rear dinette:
- Remove the back cushion and store it on the floor.
- Press the button on the side of the bench to lower the bed. Lower the bed until it stops on top of the bottom cushion.
- To retract the bed back to the roof, press the button up.
24. Awning
To roll out the awning:
- Release the 2 hooks from the bolts at the top of the awning arms by pushing them up with the pole.
- Extend both awning arms fully until they reach the ground, then engage the locking clips to secure them in place.
- Using the pole, hook into the eye bolt in the middle of the awning and pull away from the motorhome.
To retract the awning:
- Disengage the locking clips on both awning arms.
- Carefully fold each arm upward, guiding it back into its mounting bracket.
- Insert the pole's hook end into the eye bolt on the awning rail.
- Twist the pole clockwise to wind the awning neatly and secure it in place.
25. Diesel fuel
The vehicle accepts diesel fuel only. Do not refill with any other fuel or fluid.
- The diesel tank cap is marked with "DIESEL" and is unlocked using the vehicle diesel key.
- The fuel filling location is next to the passenger door.
- Open the lid using your hands, then use the diesel key to unlock. Turn the key anticlockwise to unlock the cap.
- Once filled, place the fuel cap on the inlet and turn the key clockwise to lock.
Important: If you accidentally fill the vehicle with unleaded fuel, water, or AdBlue - do not start the engine. Call STAR RV Roadside Assistance immediately.
26. Jack and spare tyre
The jack is located on the floor in front of the passenger seat. Use a butter knife or similar tool to gently unscrew the compartment cover. The jack tools are inside.
The spare tyre can be found underneath the rear of the vehicle. Use the provided tool to access it. Follow all safety precautions when handling the spare tyre.
27. Barbecue
To set up the barbecue:
- Pull the barbecue out and grab the orange pipe. Align the gas valve with the gas inlet and insert it.
- Twist down until the line of the red valve aligns with the top of the valve. Make sure the gas is turned on at the bottom.
28. Additional information
- Tyre size: 205/75 R/16C
- Tyre pressure: 60 PSI
- Oil type: 5W30
- Coolant type: Red coolant (any brand)
29. Dash warning lights
2018 model
Symbol | Warning light | Description | What to do |
|---|---|---|---|
| Brake warning (Red) | Handbrake engaged or low brake fluid. If shown with ABS light, brake fault. | Pull over safely and avoid sudden braking. If shown with the ABS light, stop immediately and contact Roadside Assistance. | |
| ABS warning (Amber) | ABS fault - brakes still work without ABS. If shown with brake light, possible brake failure. | If on alone, drive cautiously and check as soon as possible. If shown with brake light, stop immediately and call Roadside Assistance. | |
| Electronic Stability Control (Amber) | Traction control fault. Flashing = active; constant = fault. | Drive with caution. Restart the engine; if it stays on, contact Roadside Assistance. | |
| Electronic Brakeforce (Amber / Red) | The braking system has malfunctioned. | You can still drive very cautiously - contact Roadside Assistance. | |
| Airbag / SRS (Red) | Fault in airbag or seatbelt system. | Contact Roadside Assistance. | |
| Coolant overheat (Red) | Engine overheating - possible low coolant or leak. | Stop immediately and contact Roadside Assistance. | |
| Power steering (Amber / Red) | Overheated or failed steering assist. | If red, take extra care steering. Pull over and contact Roadside Assistance. | |
| Battery charge (Amber / Red) | Battery not charging. | Contact Roadside Assistance. | |
| Oil pressure (Red) | Low oil pressure or high oil temperature. | Stop immediately and contact Roadside Assistance. | |
| Engine management (Amber) | Fault with engine or emissions. | Continue to your destination, then contact Roadside Assistance. | |
| Immobilizer (Amber) | Anti-theft fault or key battery issue. | Continue driving and contact Roadside Assistance. | |
| Tyre pressure (Amber) | Low tyre pressure or puncture. | Inflate to spec; if flat, stop and call Roadside Assistance. | |
| Glow plugs (Amber) | Fault with glow plugs or relay. | Safe to drive short term - contact Roadside Assistance. | |
| AdBlue (Red) | AdBlue additive level is low. | Safe to drive a short distance. Top up with AdBlue as soon as possible. The AdBlue cap is next to the fuel filler cap and is blue. Do NOT put AdBlue into the fuel. Always fill with at least 5 litres. | |
| Diesel particulate filter (Amber) | DPF regenerating or blocked. | Continue driving for 15 minutes. If it persists, call Roadside Assistance. | |
| Windshield washer fluid (Amber / Yellow) | Windshield washer fluid level is low. | Fill up with fresh water when convenient. The filler bottle is under the bonnet and has a blue cap. | |
| Maintenance | Vehicle is due or close to scheduled service. | This is just an indication. Service can be carried out when you return the vehicle. | |
| Warning triangle (Yellow) | Multiple possible causes including: Fuel Inertia Cut-Off Switch activated; lights failure (rear fog lamps, indicators, brake lights, number plate lights, side lights, daytime running lights, main beam); airbag warning light failure; rain sensor failure; diesel filter sensor failure; engine oil pressure sensor failure; parking sensor failure; water in diesel fuel filter; engine oil level sensor failure; insufficient engine oil level; low engine oil pressure warning light failure. | Continue driving but pay attention and note anything that doesn't feel or sound right. Contact Roadside Assistance at your destination and report any findings. |
2019–2023 model
Symbol | Warning light | Description | What to do |
|---|---|---|---|
| Brake warning (Red) | Handbrake engaged or low brake fluid. If shown with ABS light, brake fault. | Pull over safely and avoid sudden braking. If shown with the ABS light, stop immediately and contact Roadside Assistance. | |
| ABS warning (Amber) | ABS fault - brakes still work without ABS. If shown with brake light, possible brake failure. | If on alone, drive cautiously and check as soon as possible. If shown with brake light, stop immediately and call Roadside Assistance. | |
| Electronic Stability Control (Amber) | Traction control fault. Flashing = active; constant = fault. | Drive with caution. Restart the engine; if it stays on, contact Roadside Assistance. | |
| Electronic Brakeforce (Amber / Red) | The braking system has malfunctioned. | You can still drive very cautiously - contact Roadside Assistance. | |
| Airbag / SRS (Red) | Fault in airbag or seatbelt system. | Contact Roadside Assistance. | |
| Coolant overheat (Red) | Engine overheating - possible low coolant or leak. | Stop immediately and contact Roadside Assistance. | |
| Power steering (Amber / Red) | Overheated or failed steering assist. | If red, take extra care steering. Pull over and contact Roadside Assistance. | |
| Battery charge (Amber / Red) | Battery not charging. | Contact Roadside Assistance. | |
| Oil pressure (Red) | Low oil pressure or high oil temperature. | Stop immediately and contact Roadside Assistance. | |
| Engine management (Amber) | Fault with engine or emissions. | Continue to your destination, then contact Roadside Assistance. | |
| Immobilizer (Amber) | Anti-theft fault or key battery issue. | Continue driving and contact Roadside Assistance. | |
| Tyre pressure (Amber) | Low tyre pressure or puncture. | Inflate to spec; if flat, stop and call Roadside Assistance. | |
| Glow plugs (Amber) | Fault with glow plugs or relay. | Safe to drive short term - contact Roadside Assistance. | |
| AdBlue (Red) | AdBlue additive level is low. | Safe to drive a short distance. Top up with AdBlue as soon as possible. The AdBlue cap is next to the fuel filler cap and is blue. Do NOT put AdBlue into the fuel. Always fill with at least 5 litres. | |
| Diesel particulate filter (Amber) | DPF regenerating or blocked. | Continue driving for 15 minutes. If it persists, call Roadside Assistance. | |
| Windshield washer fluid (Amber / Yellow) | Windshield washer fluid level is low. | Fill up with fresh water when convenient. The filler bottle is under the bonnet and has a blue cap. | |
| Brake pad (Yellow) | A sensor has detected that your brake pad is at 20%. | Continue driving. If you have more than 5,000 km left on your trip, contact Roadside Assistance. | |
| Maintenance | Vehicle is due or close to scheduled service. | This is just an indication. Service can be carried out when you return the vehicle. | |
| Warning triangle (Yellow) | Multiple possible causes including: Fuel Inertia Cut-Off Switch activated; lights failure (rear fog lamps, indicators, brake lights, number plate lights, side lights, daytime running lights, main beam); airbag warning light failure; rain sensor failure; diesel filter sensor failure; engine oil pressure sensor failure; parking sensor failure; water in diesel fuel filter; engine oil level sensor failure; insufficient engine oil level; low engine oil pressure warning light failure. | Continue driving but pay attention and note anything that doesn't feel or sound right. Contact Roadside Assistance at your destination and report any findings. |